Create Linux GVM system with android build
Here we are talking about the android or Linux system running under QNX hypervisor VM. We are not talking about the bare metal android or Linux system.
Android GVM
A typical cockpit product architecture is using QNX as host system. The QNX virtualization extension supports to launch a virtual machine which called QVM. Here is more information about the cockpit product.
There is no big difference between the android launched by QVM and the bare metal one. Except the android kernel needs to use different driver for virtualization. Such as for the storage device, the virtio-blk driver is used to access the partitions passed from QNX host to the guest.
If you never heard about hypervisor or QNX hypervisor. Please refer to these links for some summary:
Brief
QNX Hypervisor bookset
Reuse android images to create a new system
This section provide a method to create a Linux system which reusing the image as much as possible from the available daily build.
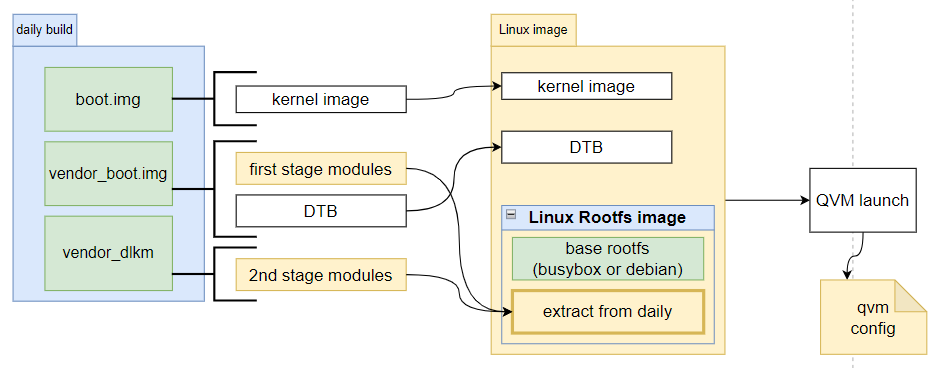
From android image, we can get kernel image, device tree and kernel modules. Below is the android image list. The kernel image can be extracted from boot.img. The first stage modules can be get from extracted from vendor_boot.img. The rest of kernel modules can be found from the build folder of android, the folder vendor_dlkm and system_dlkm. Those are the remaining kernel modules.
├── boot.img
├── dtbo.img
├── map.img
├── metadata.img
├── persist.img
├── super.img
├── userdata.img
├── vbmeta.img
└── vendor_boot.img
With those images extracted from the available android build like below picture we can create new system image with those android images plus a busybox rootfs.
Exact boot.img and vendor_boot.img
Please refer to the section Android images to get the introduction about how to unpack the image.
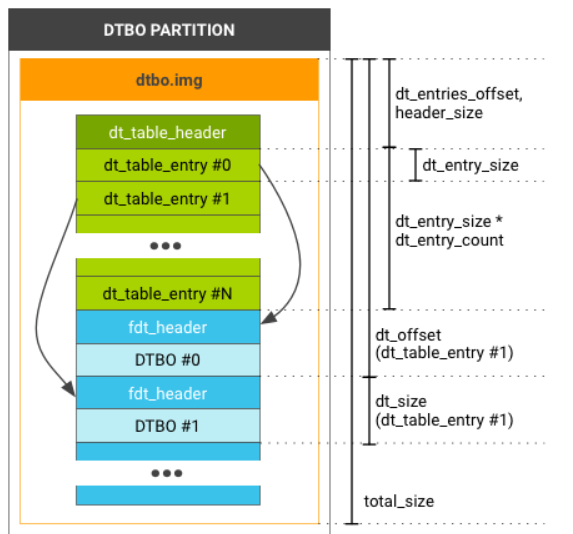
dtbo.img
dtbo.img is the image which for the device tree partition. It defines a data structure to store multiple boards’ device tree blob. The layout is like below. For the detail please refer to the introduction.
There is command which called mkdtimg to dump and split the dtbo.img file. Here are some examples for using it.
Dump the entries: below is the log to dump a dtbo.img.
user@ubnutu:/media/red-wd4tb/temp_pd_rfs/dtbo$ ./mkdtimg dump dtbo.img. The original command from android is not supporting to dump the board-id. This improvement is done by me to print the board-id for us to identofy which entry is the one we are using.

dt_table_header:
               magic = d7b7ab1e
          total_size = 399808
         header_size = 32
       dt_entry_size = 32
      dt_entry_count = 9
   dt_entries_offset = 32
           page_size = 4096
             version = 0
dt_table_entry[0]:
             dt_size = 7044
           dt_offset = 320
                  id = 00000000
                 rev = 00000000
           custom[0] = 00000000
           custom[1] = 00000000
           custom[2] = 00000000
           custom[3] = 00000000
           (FDT)size = 7044
     (FDT)compatible = qcom,monaco
/:qcom,board-id => <0, 1000001>,  len:8
dt_table_entry[1]:
             dt_size = 5654
           dt_offset = 7364
                  id = 00000000
                 rev = 00000000
           custom[0] = 00000000
           custom[1] = 00000000
           custom[2] = 00000000
           custom[3] = 00000000
           (FDT)size = 5654
     (FDT)compatible = qcom,monaco
/:qcom,board-id => <0, 1000002>,  len:8
This command also can split the dtbo.img for each entries. Here is the help information : we can use the -b to indicate the prefix of the file. To use -o to tell the folder for this files.
./mkdtimg help dump
  ./mkdtimg dump <image_file> (<option>...)

    options:
      -o, --output <filename>  Output file name.
                               Default is output to stdout.
      -b, --dtb <filename>     Dump dtb/dtbo files from image.
                               Will output to <filename>.0, <filename>.1, etc.


# do the split
./mkdtimg dump dtbo.img   -b split_dtb

ls -l spli*
-rw-rw-r-- 1 user user  7044 Jan 14 21:51 split_dtb.0
-rw-rw-r-- 1 user user  5654 Jan 14 21:51 split_dtb.1
-rw-rw-r-- 1 user user 52921 Jan 14 21:51 split_dtb.2
-rw-rw-r-- 1 user user 56154 Jan 14 21:51 split_dtb.3
-rw-rw-r-- 1 user user 56369 Jan 14 21:51 split_dtb.4
-rw-rw-r-- 1 user user 56377 Jan 14 21:51 split_dtb.5
-rw-rw-r-- 1 user user 55775 Jan 14 21:51 split_dtb.6
-rw-rw-r-- 1 user user 53408 Jan 14 21:51 split_dtb.7
-rw-rw-r-- 1 user user 55786 Jan 14 21:51 split_dtb.8
Busybox FS image
To create a busybox FS image. Please refer to the this link for detail steps.
Finally we are able to get a 64MB image which includes basic filesystem and the first stage kernel modules.
Here are the steps to create 64MB image:
dd if=/dev/zero of=./bxrfs.img bs=1M count=64
sudo losetup --find --show ./bxrfs.img         // you will get to know which loop device is attached
sudo mke2fs /dev/loopX                         //format with ext2
sudo mount /dev/loopX ../mnt_rfs/              //mount to a folder
sudo tar zxvf rfs.tar.gz -C ../mnt_rfs/        //rfs.tar.gz is the busybox FS
//copy the first stage modules from vendor boot to the bxrfs.img
sudo cp out_vendor_boot/ramdisk/lib/modules/  ../mnt_rfs/lib
This 64MB image will be load as ramdisk and this ramdisk will be mounted as rootfs of the Linux system. Please see the QVM config section for the ramdisk image configuration.
Prepare the rcS for busybox FS:
cat mnt_rfs/etc/init.d/rcS

mkdir -p /sys
mkdir -p /tmp
mkdir -p /proc
mkdir -p /mnt
mkdir -p /mnt/data             #The is used to mount a VDB passed from QNX
mkdir -p /mnt/vda              #The is used to mount a VDA passed from QNX
mkdir -p /vendor/              #This is the folder for vendor_dlkm
mkdir -p /system               #This is the folder for system_dlkm
mkdir -p /vendor/firmware_mnt  #This is the folder for mounting the FW partition

ln -s /mnt/data/vendor_dlkm/lib/ /vendor/
ln -s /mnt/data/system_dlkm/lib/ /system

/bin/mount -a
mkdir -p /dev/pts
mount -t devpts devpts /dev/pts
echo /sbin/mdev > /proc/sys/kernel/hotplug
mdev -s
mdev -d
echo "===============load modules==============="

/bin/sh /etc/load_boot_m.sh    #The script to load all modules
/bin/mount -a
To mount all necessary partitions automatically:
In this case, we have 2 additional disks to store the kernel modules which will be detect as virtio-block device.
#device  mount-point    type     options   dump   fsck order
proc /proc proc defaults 0 0
tmpfs /tmp tmpfs defaults 0 0
sysfs /sys sysfs defaults 0 0
tmpfs /dev tmpfs defaults 0 0
debugfs /sys/kernel/debug debugfs defaults 0 0

#Below 3 configs for different partition mount
/dev/vda /mnt/vda  ext4  defaults 0 0
/dev/vdb /mnt/data  ext2  defaults 0 0
/dev/vde /vendor/firmware_mnt vfat defaults 0 0
QVM config
If you are not familiar with the QNX QVM config. Please look at the QNX hypervisor guide to understand it.
Because we already have the qvm configuration for android bootup. We can recreate a QVM config based on that. Below provide key modifications for this case:
load /var/test_folder/kernel                 # Load the kernel
initrd load /var/test_folder/bxrfs.img       # Load the fs image as ramdisk
fdt load /var/test_folder/sa8155-vm-xxx.dtb  # Load the device tree blob

# The kernel command line options
# ramdisk_size here is special for the bxrfs.img size. It is telling the kernel to allocate the memory size for the ramdisk

cmdline "console=ttyAMA0 earlycon=pl011,0x1c090000 rw rootfstype=ext2 root=/dev/ram0 init=/linuxrc
ramdisk_size=65536 swiotlb=4096 kpti=0 pcie_ports=compat firmware_class.path=/vendor/firmware_mnt/image
loop.max_part=7"

# UART console
vdev vdev-pl011.so loc 0x1c090000 intr gic:37 sched 20 hostdev /dev/ptyqa

# VDA for debian rootfs, we can change root to use debian rootfs if you want.
vdev vdev-virtio-blk.so sched 10 loc 0x1c0b0000  intr gic:40 threads 4 hostdev  /var/test_folder/debian.img

# VDB for store vendor_dlkm and system_dlkm kernel modules
vdev vdev-virtio-blk.so sched 10 loc 0x1c0e0000 intr gic:39 threads 4 hostdev /var/test_folder/data.img

# VDE the android original partition which includes the FW images
vdev vdev-virtio-blk.so sched 10 loc 0x1c110000  intr gic:44 threads 4 hostdev /dev/disk/modem_a dio enable
Launch the system
First we need shutdown the default the android system because it will be launched automatically when system bootup. Use below method to shut it down:
dtach -a /tmp/vmm
su
reboot -p
# wait for android to be shutdown
The commands to launch the new system:
qvm @/var/test_folder/mid_qvm_config.config @/var/test_folder/vdisk.config &
dtach -a /tmp/vmm